Intro to Embedded System with ESP32 [Internal Sensor]
Hi, I’m back, in this blog I’ll share my experience again with the Internal Sensor of ESP32. Like the last blog, I’ll create small projects to analyze the ESP32’s internal sensors. ESP32 has some built-in sensors like touch sensor and hall effect sensor. Some people may have a temperature sensor but in my case, the ESP didn’t have it. How to know whether your ESP has a temperature sensor? Let’s check this blog!!
— Touch Sensor
The ESP32 includes ten capacitive touch GPIOs. You can see the pin reference here. These GPIOs can detect changes in anything that has an electrical charge, such as human skin. As a result, they may see differences caused by touching the GPIOs with a finger. These pins are easily integrated into capacitive pads and can be used in place of mechanical buttons.
— Hall effect sensor
A hall effect sensor may detect changes in the magnetic field around it. The sensor’s output voltage increases as the magnetic field increases.
Now let’s get into the project!
— Component Required
- ESP32
- LED
- Jumper wires
- Breadboard
- 330 Ohm Resistors
- Magnet
— Touch Sensor Experiment
First, I’m gonna test the touch sensor by following the example code from Arduino IDE.

Here’s the code provided by it:
// ESP32 Touch Test
// Just test touch pin - Touch0 is T0 which is on GPIO 4.
void setup()
{
Serial.begin(115200);
delay(1000); // give me time to bring up serial monitor
Serial.println("ESP32 Touch Test");
}
void loop()
{
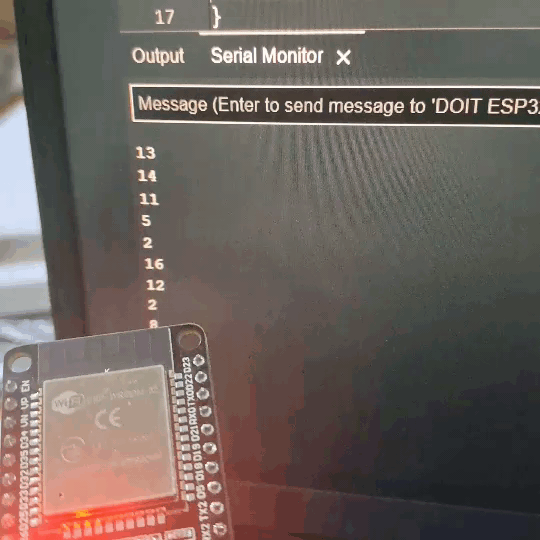
Serial.println(touchRead(4)); // get value using GPIO4
delay(1000);
}The touchRead()function gonna read the input when I touch the metal at the jumper wire that connected with ESP32. The value in the serial monitor will decrease when the metal is touched.

After knowing the basics, now I’m gonna do some experiments with the touch sensor.

First, I’ll follow the schematic and code from randomnerdstutorials.
// set pin numbers
const int touchPin = 4;
const int ledPin = 16;

// change with your threshold value
const int threshold = 20;
// variable for storing the touch pin value
int touchValue;

void setup(){
  Serial.begin(115200);
  delay(1000); // give me time to bring up serial monitor
  // initialize the LED pin as an output:
  pinMode (ledPin, OUTPUT);
}

void loop(){
  // read the state of the pushbutton value:
  touchValue = touchRead(touchPin);
  Serial.print(touchValue);
  // check if the touchValue is below the threshold
  // if it is, set ledPin to HIGH
  if(touchValue < threshold){
    // turn LED on
    digitalWrite(ledPin, HIGH);
    Serial.println(" - LED on");
  }
  else{
    // turn LED off
    digitalWrite(ledPin, LOW);
    Serial.println(" - LED off");
  }
  delay(500);
}
When the metal is touched, the light will turn on.

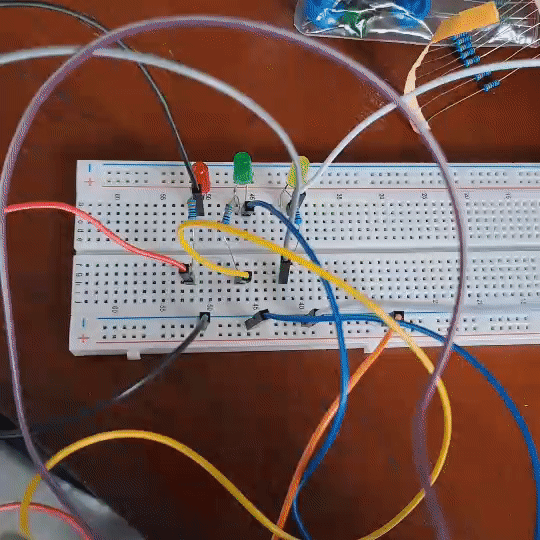
After following the schematic, I try to modify the code and schematic a little bit like this:
// set pin numbers
const int touchPin = 4;
const int ledPin = 16;
const int ledPin2 = 17;
const int ledPin3 = 18;

// change with your threshold value
const int threshold = 20;
// variable for storing the touch pin value
int touchValue;

void setup(){
  Serial.begin(115200);
  delay(1000); // give me time to bring up serial monitor
  // initialize the LED pin as an output:
  pinMode (ledPin, OUTPUT);
  pinMode (ledPin2,OUTPUT);
  pinMode (ledPin3,OUTPUT);
}

void loop(){
  // read the state of the pushbutton value:
  touchValue = touchRead(touchPin);
  Serial.print(touchValue);
  // check if the touchValue is below the threshold
  // if it is, set ledPin to HIGH
  if(touchValue < threshold){
    // turn LED on
    digitalWrite(ledPin, HIGH);
    delay(500);
    digitalWrite(ledPin2, HIGH);
    delay(500);
    digitalWrite(ledPin3, HIGH);
    delay(500);
    digitalWrite(ledPin, LOW);
    delay(500);
    digitalWrite(ledPin2, LOW);
    delay(500);
    digitalWrite(ledPin3, LOW);
    delay(500);
    Serial.println(" - LED on");
  }
  else{
    // turn LED off
    digitalWrite(ledPin, LOW);
    digitalWrite(ledPin2, LOW);
    digitalWrite(ledPin3, LOW);
    Serial.println(" - LED off");
  }
  delay(500);
}
— Hall Effect Sensor Experiment
After doing the Touch Sensor I’ll create an experiment about the hall effect sensor.
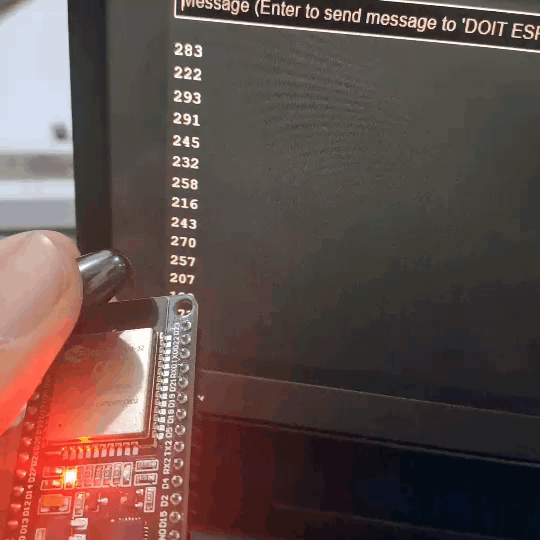
I’ll use the code below to test the hall effect value:
int val = 0;

void setup() {
  Serial.begin(9600);
}

// put your main code here, to run repeatedly
void loop() {
  // read hall effect sensor value
  val = hallRead();
  // print the results to the serial monitor
  Serial.println(val);
  delay(1000);
}
Here’s the result after I run the code without a magnet:
And here’s the result with a magnet near the ESP32 sensor:
The closer the magnet, the value will also be greater or negative depending on the magnet pole.
— Temperature Sensor
The code I’ll use is provided by https://circuits4you.com.
/*
 *  https://circuits4you.com
 *  ESP32 Internal Temperature Sensor Example
 */

 #ifdef __cplusplus
  extern "C" {
 #endif

  uint8_t temprature_sens_read();

#ifdef __cplusplus
}
#endif

uint8_t temprature_sens_read();
//====================================================
//         Setup
//====================================================
void setup() {
  Serial.begin(115200);
}

//====================================================
//         Loop
//====================================================
void loop() {
  Serial.print("Temperature: ");

  // Convert raw temperature in F to Celsius degrees
  Serial.print((temprature_sens_read() - 32) / 1.8);
  Serial.println(" C");
  delay(1000);
}
This result means my ESP32 didn’t have a temperature sensor.
— Error Encounter
- When looking at the serial monitor make sure the baud value in the serial monitor equals the value in the code.
By following the step above you’ve already finished this simple project about ESP32 Internal Sensor. Congrats 🎉. This is simply a simple experiment with ESP’s internal sensor; you may try more complex circuits and programs.
I hope this blog can be useful for those who are learning and getting started using ESP32. That’s all for this project, stay tuned for the next experiment with ESP32 !!